A few years ago, I moved a co-located site over to Amazon Web Services. This included web servers, data base servers, load balancers, etc. At the time I figured an ample 8GB would be sufficient space to house our modest Postgresql database. I was right… for a time. Two years after the move, we started to run out of space due to miscellaneous file clutter: database dumps and log files grew. Clearing up this mess helped a bunch, but over time the database itself grew. Now it’s too large for the once spacious 8 gig.
It’s not easy but it’s not terribly hard
When I first started looking into this I was hoping to find some kind of magic dial that I could tweak in the AWS management console - something I could adjust to dynamically increase the size of the database volume. It doesn’t exist.
Instead, you have to create a new volume… something bigger… something that will accommodate the growth of your data. Though there are a lot of steps, from a birds eye, they are grouped into a few logical chunks and I will lay them out in relatively excruciating detail in this article. Don’t worry, it’s a good kind of pain.
Here’s an overview:
- For the love of god, back your stuff up
- Create a new volume and hook it into your EC2 instance
- Copy the old data volume to the new
- Move the new data volume to the old volume’s location
- Verify and cleanup
Assumptions
1) These instructions assume you have experience in a unix terminal. You’ll be using commands like chmod to change permissions, chown to change ownership, cp to copy files, etc.
2) These instructions also assume some familiarity with Amazon’s AWS web management console. If you are not hosting your database on an AWS EC2 instance, then the steps may be of less direct benefit - though you may find useful concepts.
3) Although these instructions are meant to expand the data volume of a Postgresql database, they can be adapted to other database back ends, provided the data files are housed in an AWS EBS volume and you know where they are located.
For the love of god, back your stuff up
Before you begin, back up your database with your favorite backup tools - something like this, but use your preferred settings:
> pg_dump -h localhost -f dump.sql -Fc -Z0 -bO mydatabase
Make an AMI backup of you database server instance
With this done, head over to the AWS management console, go to the EC2 section and find your EC2 database server instance - we’re going to back that up too. Right click on the database server insance and select “Create Image (EBS AMI)” - we’re going to create an AMI image out of the running database.
A dialog box will open, prompting you to enter a name and description. If you can afford to shut down the database server while the back up runs, leave the “No Reboot” checkbox unchecked - the server will be shut down before the backup begins, leaving it in a clean state. However, if a database shutdown is not an option, check “No Reboot” - you can find further documentation about this at the AWS documentation site.
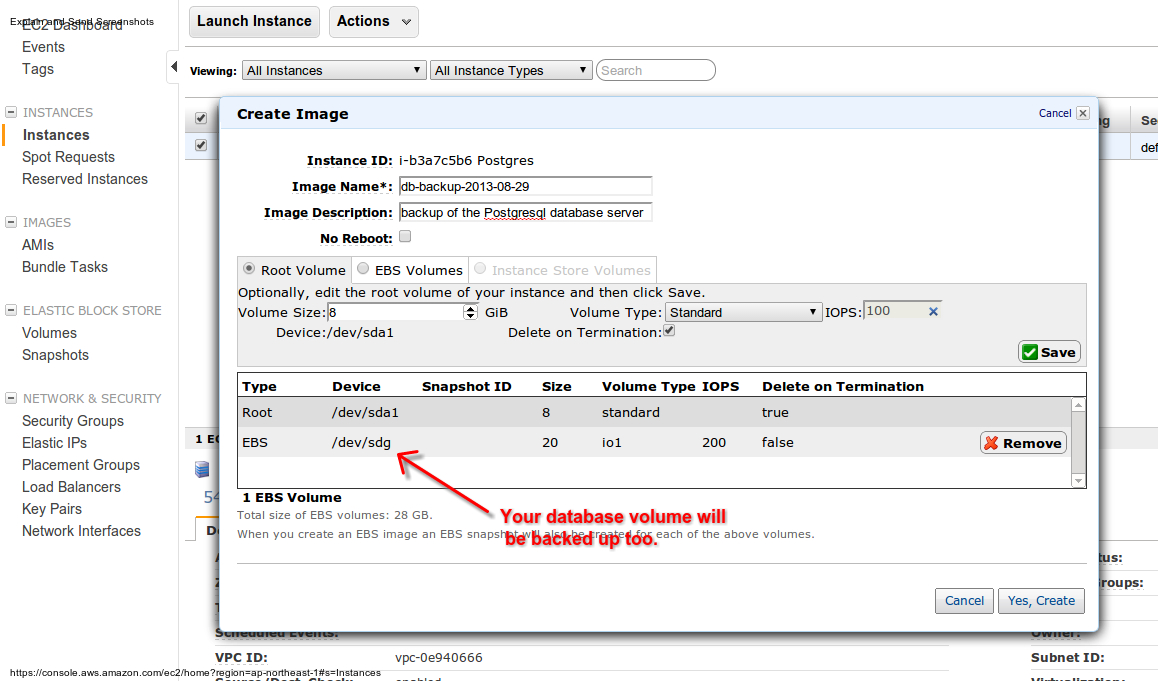
Give the AMI image a relevant name then click “Yes, Create”
Depending on the size of your volume, this could take some time. You can view the AMI backup in progress by clicking “AMI” on the side bar of the AWS EC2 panel.
Create a new volume and hook it into your EC2 instance
OK… now that you’re all backed up, let’s start working on the new EBS volume. Click the volumes link on the left side of the EC2 section of the aws management console, then click “Create Volume”. The following dialog will open:
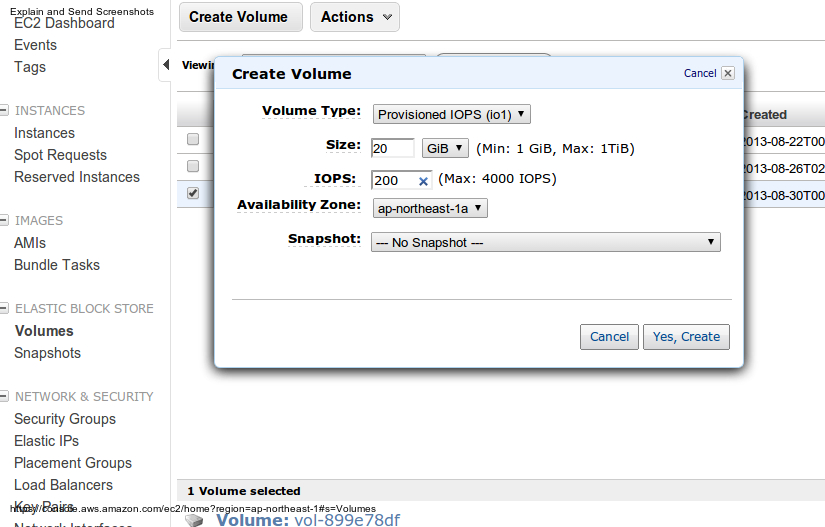
Select a volume type and size. If you’re creating an IOPS volume, give it an IOPS value as well. Amazon suggests you use an IOPS volume for database volumes, as they deliver higher performance for high I/O workloads. You can find more on the AWS documentation site.
Once you’ve entered all the required information, click “Yes, Create” - the volume should show up in the list of volumes. Next, right-click on the new volume and select “Attach” - then select your running EC2 Postgresql server instance. This will make the volume available to the database server. Take note of the device assigned to the volume - it will look something like /dev/sdg; you’ll need this when you mount the volume later.
Format and mount the volume
Let’s take a look at the new volume from within your database server instance - SSH in and take a look at your drives.
  > sudo fdisk -l
  Disk /dev/xvda1: 8589 MB, 8589934592 bytes

  ...

  Disk /dev/xvdg: 21.5 GB, 21474836480 bytes
  255 heads, 63 sectors/track, 2610 cylinders, total 41943040 sectors
  Units = sectors of 1 * 512 = 512 bytes
  Sector size (logical/physical): 512 bytes / 512 bytes
  I/O size (minimum/optimal): 512 bytes / 512 bytes
  Disk identifier: 0x00000000

  Disk /dev/xvdg doesn't contain a valid partition table
My output tells me that the new volume’s device is /dev/xvdg - look at yours to find out the device for your new volume.
Double check this device name - you will be formatting this volume in the next step; you don’t want to format the wrong volume
Now format the new volume - I formatted using the ext4 file system; use what you feel is appropriate.
> sudo mkfs.ext4 /dev/xvdg
Now that the volume is formatted, you can mount it by adding it to your /etc/fstab file - put this line at the bottom of the file:
/dev/xvdg /vol auto noatime 0 0
Time to reboot - when your database server restarts the new volume should be mounted at /vol.
Copy the database files to the new volume
Almost there. At this point the new volume should be mounted at /vol, so let’s set up some permissions and then copy the files to the new volume.
  > sudo service postgresql stop
  > sudo chown -R postgres:postgres /vol
  > sudo su postgres
  > cp -r /var/lib/postgresql/9.1/main/* /vol
Ok all the files are copied - that may have taken a little bit, depending on the size of your database. You should be operating as the postgres user, so exit out of that to get to your original database server login prompt.
> exit
Move the new data volume to the old volume’s location
Final step (aside from testing the living daylights out of the changes) - edit /etc/fstab to unmount the old volume and remount the new volume in the old volume’s location. the fstab entry should look something like this
/dev/xvdg /var/lib/postgresql/9.1/main auto noatime 0 0
Reboot again and do some final cleanup. Postgresql won’t be running - we need to set access premissions to the new volume.
  > sudo chmod 700 /var/lib/postgresql/9.1/main
  > sudo service postgresql start
And that’s it! Your database should be back on-line using the larger volume. Now would be a good time to test it out and make sure everything is working properly. If there are any problems, you can restore your old configuration from the AMI file you made earlier.
Verify and cleanup
Take a look at your disks - you should see the new volume mounted at the Postgresql data location with the new volume size.
  > df -h
  Filesystem      Size  Used Avail Use% Mounted on
  /dev/xvda1      7.8G  1.1G  6.3G  15% /
  none            4.0K     0  4.0K   0% /sys/fs/cgroup
  udev            285M   12K  285M   1% /dev
  tmpfs            59M  184K   59M   1% /run
  none            5.0M     0  5.0M   0% /run/lock
  none            295M     0  295M   0% /run/shm
  none            100M     0  100M   0% /run/user
  /dev/xvdg        20G   84M   19G   1% /var/lib/postgresql/9.1/main
Reboot your database server one last time to make sure Postgresql starts on reboot; you should be in good working order now. Keep your old db volume around in AWS for a while or use your preferred backup strategy. It’s better to be safe and keep your old data for a bit until you feel 100% comfortable with the new volume.